Pada beberapa keadaan kita menemukan printer canon ip1800 tidak melakukan respon saat kita hendak melakukan suatu print, lampu indikator hanya menunjukkan lampu oren yang terus menyala, kemungkinan setingan printer anda telah berubah tanpa sengaja oleh sistem oleh karena itu kita perlu me-reset kembali printer pada keadaan awal, video berikut akan menjelaskan cara memperbaiki printer canon ip1800 yang bermasalah. Mengapa memilih tutorial video?, banyak orang yang membaca tutorial online namun sering mendapatkan hal dijelaskan adalah tidak sesuai dengan yang harus kita lakukan pada saat eksekusi.
Saturday, April 7, 2012
Video Tutorial Cara Install php di komputer windows
php adalah sebuah jenis bahasa pemograman tingkat tinggi yang berjalan pada server web, pada beberapa tahun terakhir kebanyakan pengembang aplikasi web telah menggunakan bahasa php untuk untuk mengembangkan situsnya. Berikut adalah videdo tutorial mengenai tata cara instalasi aplikasi php di komputer windows 7 .Mengapa memilih video?, banyak orang yang membaca tutorial online namun sering mendapatkan hal dijelaskan adalah tidak sesuai dengan yang harus kita lakukan pada saat eksekusi.

Video tutorial cara install xampp di komputer / laptop - aplikasi webserver
Xampp adalah sebuah aplikasi terbitan apache friends yang digunakan untuk membuat komputer anda menjadi semacam web hosting lokal sehingga anda dapat mencoba menjalan kan berbagai macam perintah php dan skrip web lainnya bahkan anda juga dapat menginstall dan menjalankan aplikasi web wordpress melalui komputer anda tampa harus terkoneksi dengan internet. Berikut adalah video mengenai tutorial cara menginstall aplikasi xampp pada perangkat komputer anda. Mengapa memilih video?, banyak orang yang membaca tutorial online namun sering mendapatkan hal dijelaskan adalah tidak sesuai dengan yang harus kita lakukan pada saat eksekusi.
Baca Selengkapnya ...
Video tutorial cara install ubuntu debian linux 11.10 di komputer ataulaptop
Pada video dibawah ini anda akan diterangkan mengenai tata cara instalasi operasi sistem ubuntu linux 11.10 di komputer atau laptop anda secara lengkap. Mengapa memilih video?, banyak orang yang membaca tutorial online namun sering mendapatkan hal dijelaskan adalah tidak sesuai dengan yang harus kita lakukan pada saat eksekusi.
Thursday, April 5, 2012
Cara install driver printer canon pixma ip1800 di ubuntu debian linux
Berikut adalah tutorial mengenai cara instalasi printer ip1800 di ubuntu:
- download 2 file berikut
cnijfilter-common_2.70-2_i386.deb
cnijfilter-ip1800series_2.70-2_i386.deb
- klik 2 kali pada masing2 file
- masuk ke System -> Administration -> Printing, pilih iP1800 dan tekan tombol Change.
- Pilih / usr/share/cups/model/custom/canonip1800.ppd
- Pada jendela preferences window tekan Apply.
- Matikan kemudian hidupkan kembali printer.
Cara install driver printer HP Laserjet p1006 di ubuntu debian linux
Berikut adalah tutorial mengenai instalasi driver printer p1006 di ubuntu :
sudo make
sudo ./getweb p1006
sudo make install
sudo make install-hotplug cups
Baca Selengkapnya ...
- masukkan perintah ke terminal : sudo apt-get install build-essential autoconf gcc foomatic-filters cupsys
- Download driver HP laserjet P1006 dari : http://foo2xqx.rkkda.com
- Extract driver dengan perintah : tar xzvf foo2zjs.tar.gz
- masuk ke folder hasil extract : cd foo2zjs
- masukkan perintah berikut di terminal :
sudo make
sudo ./getweb p1006
sudo make install
sudo make install-hotplug cups
- Masuk ke bagian printer dari administrator menu, dan kemudian delete printer P1006 yang sudah ada dan kemudian coba tambahkan lagi.
- Lakukan test print
Tuesday, April 3, 2012
cara install Tomahawk 0.2.2 PPA di ubuntu debian linux
Install Tomahawk 0.0.3 on ubuntu using PPA - Open the terminal and run the following commands
sudo add-apt-repository ppa:paulo-miguel-dias/tomahawk
sudo apt-get update
sudo apt-get install tomahawk
Baca Selengkapnya ...
sudo add-apt-repository ppa:paulo-miguel-dias/tomahawk
sudo apt-get update
sudo apt-get install tomahawk
cara install shotwell 0.11 lewat ppa di ubuntu debian linux - aplikasiphoto manager
Install shotwell 0.11 on ubuntu using PPA
Open the terminal and run the following commands
sudo add-apt-repository ppa:yorba/ppa
sudo apt-get update
sudo apt-get install shotwell
Baca Selengkapnya ...
Open the terminal and run the following commands
sudo add-apt-repository ppa:yorba/ppa
sudo apt-get update
sudo apt-get install shotwell
cara install FileZilla client 3.5.1 di ubuntu debian linux - ftp filemanager
Install filezilla 3.5.1 using PPA
Open th terminal and run the following commands
sudo add-apt-repository ppa:n-muench/programs-ppa
sudo apt-get update
sudo apt-get install filezilla
Baca Selengkapnya ...
Open th terminal and run the following commands
sudo add-apt-repository ppa:n-muench/programs-ppa
sudo apt-get update
sudo apt-get install filezilla
cara install MongoDB di ubuntu linux server - aplikasi buat database
Install MongoDB on ubuntu server
Install mongoDB server with php support
sudo apt-get install mongodb mongo-clients php5-dev
Now download the official mongoDB php driver from github using the following command
git clone https://github.com/mongodb/mongo-php-driver.git
Now go to the directory and run the following commands
cd mongo-php-driver
phpize
./configure
sudo make install
Now you need to copy the driver to php extenstion directory you can find this using the following command
php -i | grep extension_dir
Once you know the copy
sudo cp modules/mongo.so /path/to/php/extension_dir/
Now create a file to load the driver into php at start up
sudo vi /etc/php5/conf.d/mongo.ini
with the line:
extension=mongo.so
Save and exit the file
Finally restart apache server using the following command
sudo /etc/init.d/apache2 restart
Testing
If you want to test this go grab a copy of the excellent phpMoAdmin and drop the file anywhere you load it through a browser.
Via WGO
Baca Selengkapnya ...
Install mongoDB server with php support
sudo apt-get install mongodb mongo-clients php5-dev
Now download the official mongoDB php driver from github using the following command
git clone https://github.com/mongodb/mongo-php-driver.git
Now go to the directory and run the following commands
cd mongo-php-driver
phpize
./configure
sudo make install
Now you need to copy the driver to php extenstion directory you can find this using the following command
php -i | grep extension_dir
Once you know the copy
sudo cp modules/mongo.so /path/to/php/extension_dir/
Now create a file to load the driver into php at start up
sudo vi /etc/php5/conf.d/mongo.ini
with the line:
extension=mongo.so
Save and exit the file
Finally restart apache server using the following command
sudo /etc/init.d/apache2 restart
Testing
If you want to test this go grab a copy of the excellent phpMoAdmin and drop the file anywhere you load it through a browser.
Via WGO
cara install gscan2pdf 1.0.0 di ubuntu debian linux - aplikasi convertdokumen ke pdf
Open the terminal and run the following commands
sudo add-apt-repository ppa:jeffreyratcliffe/ppa
sudo apt-get update
sudo apt-get install gscan2pdf
Baca Selengkapnya ...
sudo add-apt-repository ppa:jeffreyratcliffe/ppa
sudo apt-get update
sudo apt-get install gscan2pdf
cara install Flash Doctor di ubuntu debian linux – aplikasi memperbaikiflash
Install Flash Doctor on ubuntu 11.10/11.04
Open the terminal and run the following commands
sudo add-apt-repository ppa:lkjoel/flash-doctor
sudo apt-get update
sudo apt-get install flash-doctor zenity wget
Once installation completed you can open the flash doctor by running the following command from your terminal
bash /usr/bin/flash-doctor
Baca Selengkapnya ...
Open the terminal and run the following commands
sudo add-apt-repository ppa:lkjoel/flash-doctor
sudo apt-get update
sudo apt-get install flash-doctor zenity wget
Once installation completed you can open the flash doctor by running the following command from your terminal
bash /usr/bin/flash-doctor
Monday, April 2, 2012
cara install pasaffe di ubuntu debian linux - Simple Password manager
Pasaffe adalah aplikasi password manager untuk Gnome.
Install pasaffe di ubuntu
Open the terminal and run the following commands


Baca Selengkapnya ...
Install pasaffe di ubuntu
Open the terminal and run the following commands
sudo add-apt-repository ppa:mdeslaur/pasaffe
sudo apt-get update
sudo apt-get install pasaffe
Screenshots
cara install freetuxtv lewat PPA di ubuntu debian linux - tv player
Vlc harus sudah terinstall
Install freetuxtv di ubuntu 11.10
buka terminal dan jalankan pertintah berikut
Screenshots


Baca Selengkapnya ...
sudo apt-get install vlc
Install freetuxtv di ubuntu 11.10
buka terminal dan jalankan pertintah berikut
sudo add-apt-repository ppa:freetuxtv/freetuxtv-dev
sudo apt-get update
sudo apt-get install freetuxtv
Screenshots
cara install driver OKI B4100 di ubuntu debian linux
For those completely new to Ubuntu , download the file and double-click on it, then extract the .ppd file to a convenient location. Then go to System->Administration->Printing, Double-click on ‘Add new printer’, then follow instructions, when asked for printer model, click on ‘install driver’ and open your ppd file, then follow instructions again.
You can download OKI B4100 Printer Driver from here
This Drivers will Work Under Ubuntu Breezy,Dapper,Edgy and Feisty,Debian etch also
Baca Selengkapnya ...
You can download OKI B4100 Printer Driver from here
This Drivers will Work Under Ubuntu Breezy,Dapper,Edgy and Feisty,Debian etch also
Sunday, April 1, 2012
cara Menggabungkan (integrasi)Active Directory dan CentrifyDirectControl Express di ubuntu debian linux
cara Menggabungkan (integrasi)Active Directory dengan Centrify DirectControl Express , Many Ubuntu users and Administrators struggle with Active Directory integration. One approach that folks are using is the free offerings from Centrify Express.
Through the DirectManage Express or DirectControl Express downloads you can quickly and easily join a Ubuntu 11.10 (Oneiric) server or desktop to Active Directory. Using either of these approaches an intelligent install script is used to install the DirectControl Express agent and join the system to Active Directory.
Many Ubuntu users however prefer to install software packages like Centrify DirectControl Express using the built in package managers like Software Center, Synaptic, Adept, Aptitude, apt-get or others.
Recently, Canonical has certified and published Centrify DirectControl Express in the 11.10 Oneiric repository. This article will describe how to ensure that the partner repository is available and describe how to install DirectControl Express and join a system to Active Directory…
Before you get started, make sure you have:
As there are many tools to do installations, I am only going to cover two of them - Software Center and the CLI using apt tools.
Through the DirectManage Express or DirectControl Express downloads you can quickly and easily join a Ubuntu 11.10 (Oneiric) server or desktop to Active Directory. Using either of these approaches an intelligent install script is used to install the DirectControl Express agent and join the system to Active Directory.
Many Ubuntu users however prefer to install software packages like Centrify DirectControl Express using the built in package managers like Software Center, Synaptic, Adept, Aptitude, apt-get or others.
Recently, Canonical has certified and published Centrify DirectControl Express in the 11.10 Oneiric repository. This article will describe how to ensure that the partner repository is available and describe how to install DirectControl Express and join a system to Active Directory…
Before you get started, make sure you have:
- The sudo password and rights to install the software regardless of the method used.
- The username and password of an Active Directory account that has permission to join a computer to AD.
NOTE: Both DirectManage Express and DirectControl Express normal installation methods automatically install the Centrify-Enabled OpenSSH package. The method described in this article does not. If you want to use the Centrify-Enabled version of OpenSSH you will need to install using either the DirectManage or DirectControl approach using the default installer.
Now you are ready to get started:
As there are many tools to do installations, I am only going to cover two of them - Software Center and the CLI using apt tools.
- The first step is to enable the Oneiric partner repository where the DirectControl Express package is made available. Via the Software Center you need to select Edit ==> Software Sources ==> Other Software (tab) and make sure the checkbox is checked for the partner repository as follows:
You can also add the partner repository from the command line as follows (for oneiric):

sudo add-apt-repository "deb http://archive.canonical.com/ oneiric partner"
- Once you have the partner repository added you are now ready to find and install the DirectControl bits.From the Software Center you can search for Centrify and you will find the following package:
Simply select install, enter your sudo password and wait for installation.Alternatively you can install via apt-get as follows:

sudo apt-get install centrifydc
- Once you have successfully install the centrifydc package you must join the system to Active Directory.
sudo adjoin -w domain.name
where domain.name is the name of your Active Directory domain.
NOTE: You will need your Active Directory administrator password to run this command. You may specify a user other than the default administrator with the -u option (--user). See the adjoin manpage for more information on how to run the adjoin command as another user.
Assuming this is successful you should be able to run the following command to verify the join:
adinfo
and the output should look something like this:
cowillia@ubuntu:~$ adinfo
Local host name: ubuntu
Joined to domain: centrify.se
Joined as: ubuntu.centrify.se
Pre-win2K name: ubuntu
Current DC: se-win2k8ent.centrify.se
Preferred site: Default-First-Site-Name
Zone: Auto Zone
CentrifyDC mode: connected
Licensed Features: Disabled
That’s all you have to do! You have now joined your Linux system to Active Directory! Verify authentication by attempting to log on to the Linux computer by using any Active Directory user account. When using Centrify DirectControl Express Edition, you are connected to the domain through Auto Zone, which is essentially one super zone for the forest. By default, when you join a domain by connecting to Auto Zone, all users and groups defined in Active Directory for the forest automatically become valid users and groups on the Linux or Mac OS X computer.
OS X computer.NOTE: GDM needs to be restarted before login for an AD user will work, the easiest way is to simply restart the system.
cara install Epiphany di ubuntu debial linux - browser
Epiphany is the web browser for the GNOME desktop. Its goal is to be simple and easy to use. Epiphany ties together many GNOME components in order to let you focus on the Web content, instead of the browser application. As part of the GNOME project, Epiphany is Free Software.
Epiphany displays webpages with the same speed and accuracy as other popular browsers, such as Safari or Firefox. In addition, it provides an elegant, responsive and uncomplicated user interface that fits in perfectly with GNOME, and it has been translated to over sixty languages!
Install Epiphany in ubuntu 11.10
Open the terminal and run the follwing commands
Screenshots


Baca Selengkapnya ...
for the GNOME desktop. Its goal is to be simple and easy to use. Epiphany ties together many GNOME components in order to let you focus on the Web content, instead of the browser application. As part of the GNOME project, Epiphany is Free Software.Epiphany displays webpages with the same speed and accuracy as other popular browsers, such as Safari or Firefox. In addition, it provides an elegant, responsive and uncomplicated user interface that fits in perfectly with GNOME, and it has been translated to over sixty languages!
Install Epiphany in ubuntu 11.10
Open the terminal and run the follwing commands
sudo add-apt-repository ppa:gnome3-team/gnome3
sudo apt-get update
sudo apt-get install epiphany-browser
Screenshots
Cara install VirtualBox 4.1.8 di ubuntu debian linux
Oracle VM VirtualBox, formerly Sun xVM VirtualBox and innotek VirtualBox, is a family of x86 virtualization products for enterprise and home use.VirtualBox is a general-purpose full virtualizer for x86 hardware, targeted at server, desktop and embedded use.
What is new in virtualbox 4.1.8
This is a maintenance release. The following items were fixed and/or added:
VMM: fixed VERR_MAP_FAILED during savestate under certain circumstances (bug #7929)
GUI: stop updating the VM status icons when the VM is paused (bug #8368)
VBoxManage: fixed wrong return code after startvm (bug #9642)
BIOS: fixed hang at launch of DOS applications generated by Clipper 5.3 (note that hardware virtualization may be required)
USB: fixed OS/2 boot hang when using recent USB drivers
NAT: increase maximum number of parallel connections making connections with port forwarding more robust (#8471)
Metrics: fixed potential problem with invalid access in guest metrics collection upon VM destruction
Main: don’t crash if a medium is ejected twice (bug #9922)
VBoxSVC: fixed crash under rare circumstances (e.g. client crash)
VRDP: fixed screen freeze (bug #9620)
OVF/OVA: fixed broken disk images on import under rare circumstances
OVF/OVA: better error message when importing corrupted appliances
VMDK/VHD: fixed a possible corruption with host cache disabled when using snapshots under rare circumstances (bug #9749)
3D Support: Fixed fullscreen mode issues for ATI graphics (bug #9775), Windows Media Player rendering for XPDM-based Direct3D support (bug #8341). Multiple fixes to XPDM and WDDM - based 3D support for Windows Guests and for 3D support in general
Linux hosts: fixes for Fedoras Linux 2.6.41 (bug #9948)
Linux hosts/guests: fixes for Linux 3.2 (bug #9743)
Solaris Additions: various shared folder fixes (bugs #9856, #9862, #9917)
Windows Additions: various fixes for Direct3D support (un)installation, added detection of missing or wrong Direct3D system files
Cara install VirtualBox 4.1.8 di ubuntu debian linux, Install virtualbox 4.1.8 on ubuntu 11.10
You need to edit /etc/apt/sources.list
Add the following line
For ubuntu 11.04 users add the following line
Save and exit the file
Update source list
sudo apt-get update
Install virtualbox
Note: Ubuntu/Debian users might want to install the dkms package to ensure that the VirtualBox host kernel modules (vboxdrv, vboxnetflt and vboxnetadp) are properly updated if the linux kernel version changes during the next apt-get upgrade. For Debian it is available in Lenny backports and in the normal repository for Squeeze and later. The dkms package can be installed through the Synaptic Package manager or through the following command:
Baca Selengkapnya ...
What is new in virtualbox 4.1.8
This is a maintenance release. The following items were fixed and/or added:
VMM: fixed VERR_MAP_FAILED during savestate under certain circumstances (bug #7929)
GUI: stop updating the VM status icons when the VM is paused (bug #8368)
VBoxManage: fixed wrong return code after startvm (bug #9642)
BIOS: fixed hang at launch of DOS applications generated by Clipper 5.3 (note that hardware virtualization may be required)
USB: fixed OS/2 boot hang when using recent USB drivers
NAT: increase maximum number of parallel connections making connections with port forwarding more robust (#8471)
Metrics: fixed potential problem with invalid access in guest metrics collection upon VM destruction
Main: don’t crash if a medium is ejected twice (bug #9922)
VBoxSVC: fixed crash under rare circumstances (e.g. client crash)
VRDP: fixed screen freeze (bug #9620)
OVF/OVA: fixed broken disk images on import under rare circumstances
OVF/OVA: better error message when importing corrupted appliances
VMDK/VHD: fixed a possible corruption with host cache disabled when using snapshots under rare circumstances (bug #9749)
3D Support: Fixed fullscreen mode issues for ATI graphics (bug #9775), Windows Media Player rendering for XPDM-based Direct3D support (bug #8341). Multiple fixes to XPDM and WDDM - based 3D support for Windows Guests and for 3D support in general
Linux hosts: fixes for Fedoras Linux 2.6.41 (bug #9948)
Linux hosts/guests: fixes for Linux 3.2 (bug #9743)
Solaris Additions: various shared folder fixes (bugs #9856, #9862, #9917)
Windows Additions: various fixes for Direct3D support (un)installation, added detection of missing or wrong Direct3D system files
Cara install VirtualBox 4.1.8 di ubuntu debian linux, Install virtualbox 4.1.8 on ubuntu 11.10
You need to edit /etc/apt/sources.list
gksudo gedit /etc/apt/sources.list
Add the following line
deb http://download.virtualbox.org/virtualbox/debian oneiric contrib
For ubuntu 11.04 users add the following line
deb http://download.virtualbox.org/virtualbox/debian natty contrib
Save and exit the file
wget -q http://download.virtualbox.org/virtualbox/debian/oracle_vbox.asc -O- | sudo apt-key add -
Update source list
sudo apt-get update
Install virtualbox
sudo apt-get install virtualbox-4.1
Note: Ubuntu/Debian users might want to install the dkms package to ensure that the VirtualBox host kernel modules (vboxdrv, vboxnetflt and vboxnetadp) are properly updated if the linux kernel version changes during the next apt-get upgrade. For Debian it is available in Lenny backports and in the normal repository for Squeeze and later. The dkms package can be installed through the Synaptic Package manager or through the following command:
sudo apt-get install dkms
Cara install Eina Media Player 0.14.0 lewat PPA di ubuntu debian linux
Current music players are focused on managing your music collection, while using mandatory criteria about how they organize it.Eina does not care about it at all. If your are an organized person, chances are your music collection is organized too, and you won’t like to spend your time rearranging it to follow your player’s specific rules. In addition, having those players to arrange music that’s randomly stored, named or tagged, is usually counterproductive.
Get all functionality
Eina works like a common portable music player. Just plays what you want to listen.
Apart from simplicity, today users expect more from a player than just reading files. Artwork, lyrics, network support, artist data and other music information find their right place in Eina.
Plugins can take care of all the extra functionality, since Eina exposes everything from its internals. It’s fairly easy to extend the player capabilities and change the way it works inside. Feel free to request new features and make things the way you like.
What is new in 0.14.0
* Support for gtk-3.2 with -DDISABLE_DEPRECATED
* Better HIG compilance for dialogs and modal windows
* Art metadata is now handled in liblomo
More sophisticated interfaces on top of liblomo
* liblomo depends on libgel
* Playlist has built-in search (try control+f)
* Dark theme used by default
* Update translations
* More documentation and gobject-introspection coverage
* New APIs for EinaPlaylist
Cara install Eina Media Player 0.14.0 lewat PPA di ubuntu debian linux, Install Eina Media Player 0.14.0 in ubuntu
Open the terminal and run the following commands
sudo add-apt-repository ppa:eina/ppa
sudo apt-get update
sudo apt-get install eina-player
Screenshots


Baca Selengkapnya ...
Get all functionality
Eina works like a common portable music player. Just plays what you want to listen.
Apart from simplicity, today users expect more from a player than just reading files. Artwork, lyrics, network support, artist data and other music information find their right place in Eina.
Plugins can take care of all the extra functionality, since Eina exposes everything from its internals. It’s fairly easy to extend the player capabilities and change the way it works inside. Feel free to request new features and make things the way you like.
What is new in 0.14.0
* Support for gtk-3.2 with -DDISABLE_DEPRECATED
* Better HIG compilance for dialogs and modal windows
* Art metadata is now handled in liblomo
More sophisticated interfaces on top of liblomo
* liblomo depends on libgel
* Playlist has built-in search (try control+f)
* Dark theme used by default
* Update translations
* More documentation and gobject-introspection coverage
* New APIs for EinaPlaylist
Cara install Eina Media Player 0.14.0 lewat PPA di ubuntu debian linux, Install Eina Media Player 0.14.0 in ubuntu
Open the terminal and run the following commands
sudo add-apt-repository ppa:eina/ppa
sudo apt-get update
sudo apt-get install eina-player
Screenshots
cara install Cisco VPN client di ubuntu linux
This tutorial explain how to install Cisco VPN client on ubuntu 11.10.On Ubuntu, you don’t need to install the Cisco VPN Client: NetworkManager includes support for Cisco IPSec VPNs.
Procedure to follow
cara install Cisco VPN client di ubuntu linux, Install network-manager-vpnc using the following command from your terminal
This will install vpnc, network-manager-vpnc and network-manager-vpnc-gnome.
Now you need to left click on your network manager applet (Located in your notification area) And choose “Configure VPN…”

Now you need to click on Add

Choose VPN connection type as “Cisco Compatible VPN(VPNC)” and click on create

Enater your cisco VPN details under VPN tab

Now you need to select IPV4 Settings tab click on routes

Here you need to select “Use this connection only for resources on its network” click ok otherwise your traffic significantly slowed down

To start your new VPN, just follow the steps again, but instead of “Configure VPN”, you’ll click on the entry you created.
Baca Selengkapnya ...
Procedure to follow
cara install Cisco VPN client di ubuntu linux, Install network-manager-vpnc using the following command from your terminal
sudo apt-get install network-manager-vpnc
This will install vpnc, network-manager-vpnc and network-manager-vpnc-gnome.
Now you need to left click on your network manager applet (Located in your notification area) And choose “Configure VPN…”

Now you need to click on Add

Choose VPN connection type as “Cisco Compatible VPN(VPNC)” and click on create

Enater your cisco VPN details under VPN tab

Now you need to select IPV4 Settings tab click on routes
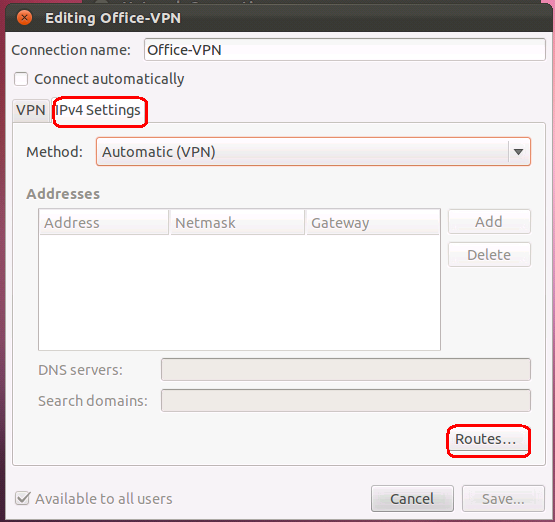
Here you need to select “Use this connection only for resources on its network” click ok otherwise your traffic significantly slowed down

To start your new VPN, just follow the steps again, but instead of “Configure VPN”, you’ll click on the entry you created.
Subscribe to:
Posts (Atom)


